Background -
pfSense is a free and open source firewall and router that also features unified threat management, load balancing, multi WAN, and more.
I started using pfsense after a router firmware issue. The router I had kept having an issue with ddos protection. I work from home, so I wanted to segment my network to isolate work devices.
Projects like this one have helped me prepare for the network+ as well as learn more about firewalls & security.
Hardware
My original pfsense hardware was purchased, used, from eBay.
| Hardware Item | Price $ |
|---|---|
| Dell OptiPlex 7010 | $76 |
| HP 331T Gigabit 4-Port Ethernet Adapter | $23 |
I swapped out (deprovisioned) my eBay machine for an unused pc I had. This setup is overkill for a pfsense appliance, but I wanted to show that you could do this with:
- a) old hardware lying around or
- b) something cheap from eBay

The Dell OptiPlex 7010 is the horizontal pc case in the image above, and the newly provisioned system is the vertical tower missing the side panel. Cable management is handled prior to putting the side panel on.
A usb flash drive will be needed to perform the pfsense installation.
I used a Samsung Bar Plus 64 GB Flash Drive to accomplish this task. This flash drive is also overkill for this project, so feel free to find whatever works within your budget.
Software
Below is a list of software used to install pfsense.
Pfsense CE
The pfsense ISO for installation.

- Version (as of writing): 2.6.0
- Architecture: AMD64 (64-bit)
- Installer: DVD Image (ISO) Installer
- Mirror: Austin, TX USA
Balena Etcher
A cross-platform tool to flash OS images onto SD cards and USB drives safely and easily. Free and open source for makers around the world. Balena Github

I used Etcher for Windows x86x64 (Installer), but you’ll need to pick the one that fits your needs.
Flash pfsense onto the flash drive that you will use at boot to install pfsense.
Install
Bios You’ll need to setup your bios to install from a flash drive. Please reference your bios manual for any questions regarding this phase of the install. Insert the usb flash drive into a usb connection, and boot from the usb device.

If you setup to boot from usb you should get a Welcome to pfsense screen. I just allow this to autoboot after the timer counts down.

Then you should get the Copyright and distribution notice. You’ll want to Accept this.

Now you should see the Welcome to pfsense! Install where you can Install pfsense. Select OK.

Next you’ll want to select the way you would like to partition your hard disk. This is going to depend on your setup. I chose to go with a ZFS partition, but you may decide something different depending on your setup.

Then you will be prompted to Configure Options. I’m going to just Select this as it is for now, but you may want to set this up differently.

Now select the disk to be configured in the ZFS Configuration.

That brings you to the Last Chance! - ZFS Configuration screen. Select YES to proceed with the installation.

As pfsense installs you should observe the Overall Progress during the installation process.

When the installer finishes you have the option to open a shell to do any final configuration. I have Yes highlighted here for myself, but you can choose No to proceed to the next prompt.

The pfsense installer will now prompt you to reboot. You will want to select Reboot here.
Post Installation
Now it’s time to setup your new installation of pfsense.

After reboot I was prompted to setup VLANs now. I chose not to do this yet by typing n when asked **Should VLANs be set up now?

Next I was prompted to setup my WAN interface. You can configure this now, or set it up later.

Then I was prompted to setup the LAN interface. Once you have set these up the configuration will be updated.

Note: You can choose a during the interface setup to auto choose the interfaces and then connect your network connection into the port/interface to show that the link is up or down. You can repeat this process while you figure out the interfaces you would like to use.
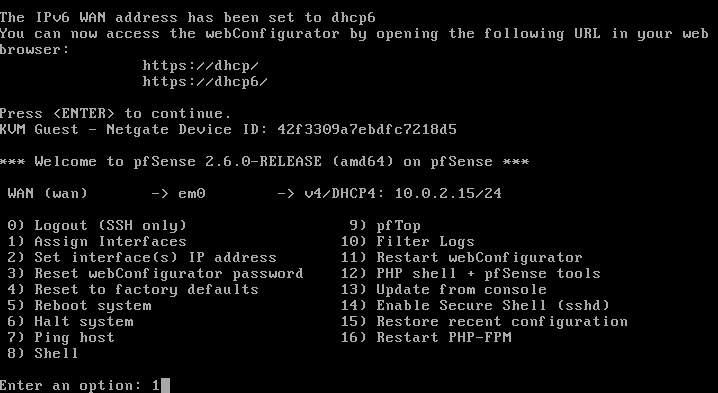
Just select option 1 when prompted for option selections at the ** pfsenseWelcome Screen**.
From here you should observe the LAN address to connect to pfsense from a browser. The default will be:
- Login Portal: https://192.168.0.1:8096
Default Credentials
- Username: admin
- Password: pfsense
pfsense is installed and can be configured from a browser on the network. I usually connect a laptop to the lan connection to continue to configure pfsense.

When you connect to the login portal you will observe a connection warning. Click Advanced and Proceed. This warning is because the cert isn’t properly setup, and isn’t something I will cover in this guide.

Now you can login with the default credentials and further configure pfsense.
Quick Post Install Tip
It’s ideal to login and change the default credentials.

Navigating to User Manager within the System drop down menu.

Now add a new user to replace the default user by clicking + Add.

Fill out the form fields for the new user and make sure to add the new user into the admins in Group Membership. Finally click Save to save the new user.
Now login as the new administrative user and you can disable the default credentials.
Tip
A great video reference to installing and setting up pfsense:
1
2
3
4
┌──(robert㉿kali)-[~]
└─$ netstat -tulpn

Active Connections (servers and established)
